


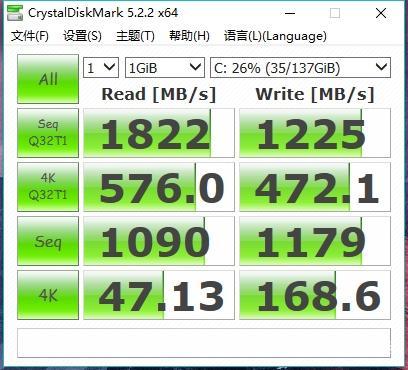
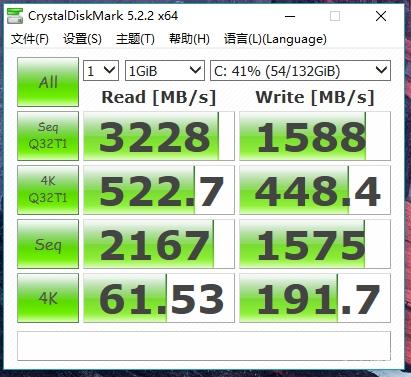
One of the cons listed in my review of the Xiaomi Mi Notebook Pro was the NVMe SSD speed was limited and capped to PCIe x 2 speeds and not x 4 which it should be, well thanks to Ferdinánd for letting me know about this bios fix that will correct the PCIe lane speed to be x4 speed. A user on the Xiaomi forums has posted a bios update that corrects this SSD speed limit and set the port to the correct speed. So this will increase the stock Samsung PM961 speeds greatly, below you can see the before and after results.
Shipped bios SSD speed:

After the bios update the PCIe port runs at full speed:

Newer Mi Notebook Pro’s shipping from the factory now will come with the latest bios (XMAKB5R0P0401) so this should only affect the first batch of Mi Notebook Pro i5 and i7 models. So check with HWinfo your bios info if you need to flash or not. Or run a simple SSD benchmark, if you get 3000Mb/s reads or close to that you have PCIe X4 on the M.2 slot so you’re fine!
Flash with caution, remember to have a full battery and let the bios update complete. Interrupting it will brick the laptop!
Source: Xiaomi.cn forums (Chinese)
[wpfilebase tag=file id=625 tpl=download-button /]
Instructions:
Step0 – Ensure Laptop is at 80% battery or more and that it is PLUGGED IN.
Step1 – Download Rufus (https://rufus.akeo.ie/) and format a usb to be “GPT Partitioning scheme for UEFI” and Filesystem set as “FAT32.” USB must be in the top USB port; usb boot does not work on the other.
Step2 – Copy files from extracted file (use winrar or 7zip to extract) then copy all files and make sure there is an EFI folder at the root of the drive. Shutdown laptop.
Step3 – Switch on and keep pressing F2 to enter BIOS. Once there, disable secure boot and clear keys, then go an enable USB boot. You need to set a supervisior password first (keep it handy for future reference). Look at other guides on how to use the BIOS. Press F10 to save changes and restart. Shutdown PC.
Step4 – Switch on and keep pressing F12 to enter boot selection menu. You will find the usb there. The UEFI shell should load until you see a fs: .
Step5 – Type unlockme in the to unlock bios. This is will boot into windows but there is a high chance you wont be able to login. Shut down the PC.
Step6 – Repeat Step4 and then type flash to begin flashing. This will reboot and start flashing. BE PATIENT and let it finish. It will boot into windows finally.
Step7 – Fingerprint might not work, you will need to type in your password to log in.
Step8 – Use same instructions as Step3 and enable secure boot and other settings you may want. Press F10 to save and reboot.
Step9(optional) – Login to PC and then right click start menu and then settings. Go to Accounts then sign in options. Remove fingerprint and then add it back again.
Ensure that you have ENOUGH POWER on the laptop as flashing disables charging momentarily. Keep it plugged in throughout all the steps above and then make sure you download the latest samsung drivers. (http://org.downloadcenter.samsung.com/downloadfile/ContentsFile.aspx?CDSite=UNI_SEC&CttFileID=6929458&CDCttType=DR&ModelType=N&ModelName=MZ-V6P512&VPath=DR/201710/20171026151637517/Samsung_NVM_Express_Driver_2.3.exe&OriginYN=N)
http://www.samsung.com/semiconductor/minisite/ssd/download/tools.html
Latest Intel ME driver: http://www.station-drivers.com/index.php?option=com_remository&Itemid=352&func=startdown&id=3214&lang=en
Latest Wifi Driver: http://www.station-drivers.com/index.php?option=com_remository&Itemid=352&func=fileinfo&id=3203&lang=en
Latest Intel Chipset Drivers: http://www.station-drivers.com/index.php?option=com_remository&Itemid=352&func=startdown&id=3172&lang=en