
Update: 14th June, I’ve added the latest Dual OS PiPo W3F files for download. Please use those ones as they have the latest drivers and bug fixes etc. If your having issues with the Android rom, you could try updating with the included files. Since the download files are rather huge, please only download this if your going to use it to help save our bandwidth. If you’re able to mirror this files, please share a link in the comments.
Archive password: techtablets.com
I’ve been able to download the required Android Rom, Windows image and dual boot file for the PiPo W3F, they are below. I’ve used google translate to translate (roughly) what’s required and then make it readable without all this talk of brushing Andrews in the translation gone horribly wrong (lol). PiPo say to make up 3 different flash drives. One for the bios flashing, one for the Android Rom and the other for the WinPE Windows image. But really you could do this with just one as long as you have the patience.

Prep:
8gb usb 2.0 flash drive or three (I find usb 2.0 works best, I had issues with my usb 3 drive for some reason). A usb hub or the micro to normal usb adapter if you don’t have the dock for a usb keyboard. Maybe take a Windows image backup of your current Windows 8.1 Bing system as a back up so you can restore the machine to an original state. Also read and copy the Windows 8.1 Bing cd key of your unit. It might be required later to activate Windows. I didn’t copy mine and should have.
Step 1:
Download and extract the files 5.25GB’s worth, extract with winrar to a folder. Format a usb stick to fat32 and move the s-bios(1) files inside there to this fat32 stick. Rename the I8211V6MIPI_V1.7.0_R008_DualOS_20150128.bin to something you’ll remember like bios.bin, that’s what I did! (Will make things much easier)
Step 2:
Flashing the dual boot bios: Reboot your Pipo W3F and using a usb hub and keyboard or the keyboard dock enter the bios by pressing esc or del on the bios booo screen. Head to Save & Exit bios menu and then Launch EFI Shell from filesystem device.
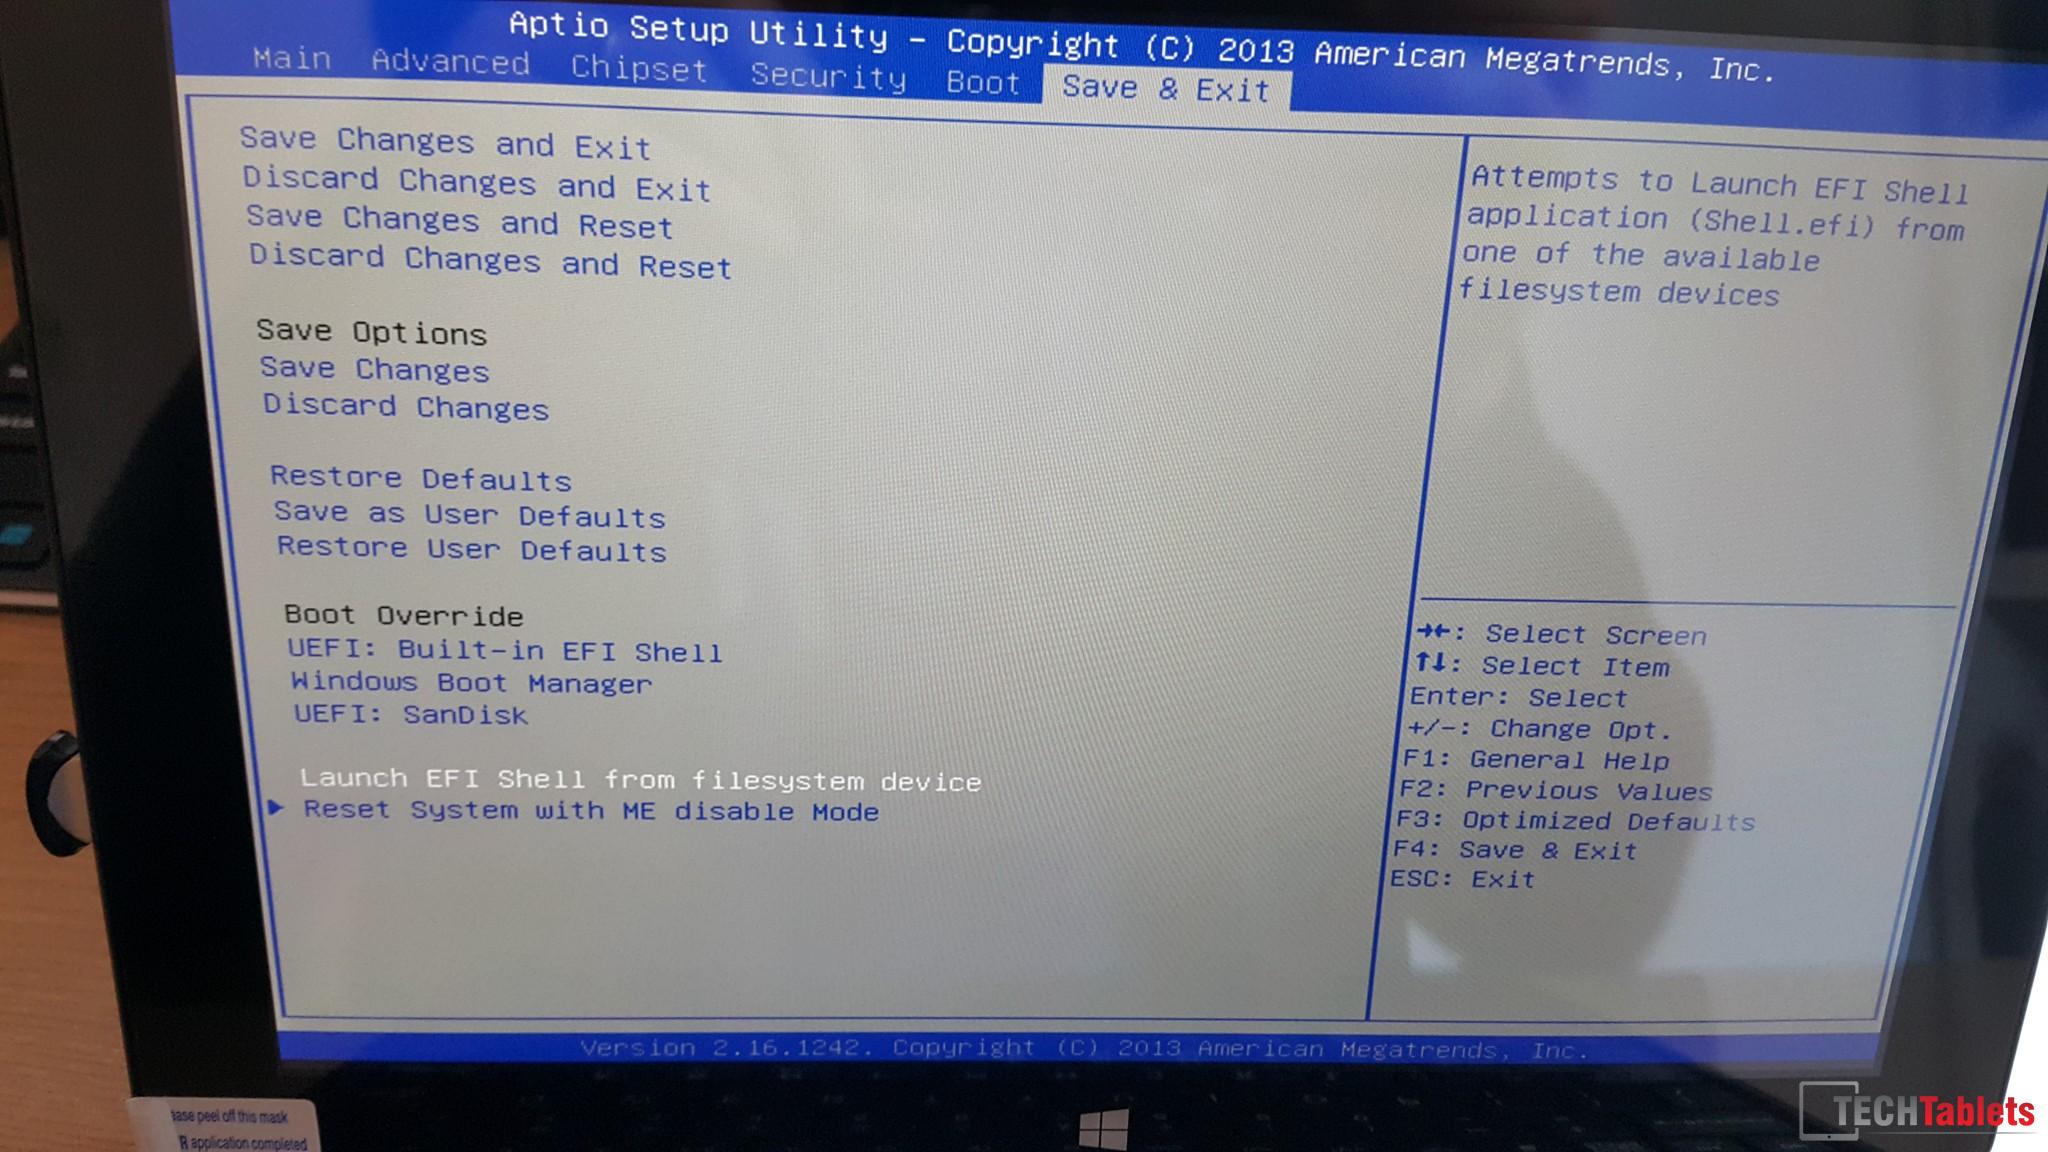
Select: Launch EFI Shell from filesystem device.
You will then boot into the EFI shell. Now we need to browser to the drive you have plugged in ith the bios files. In my case it was fs3: if your using a hub it might be fs4:
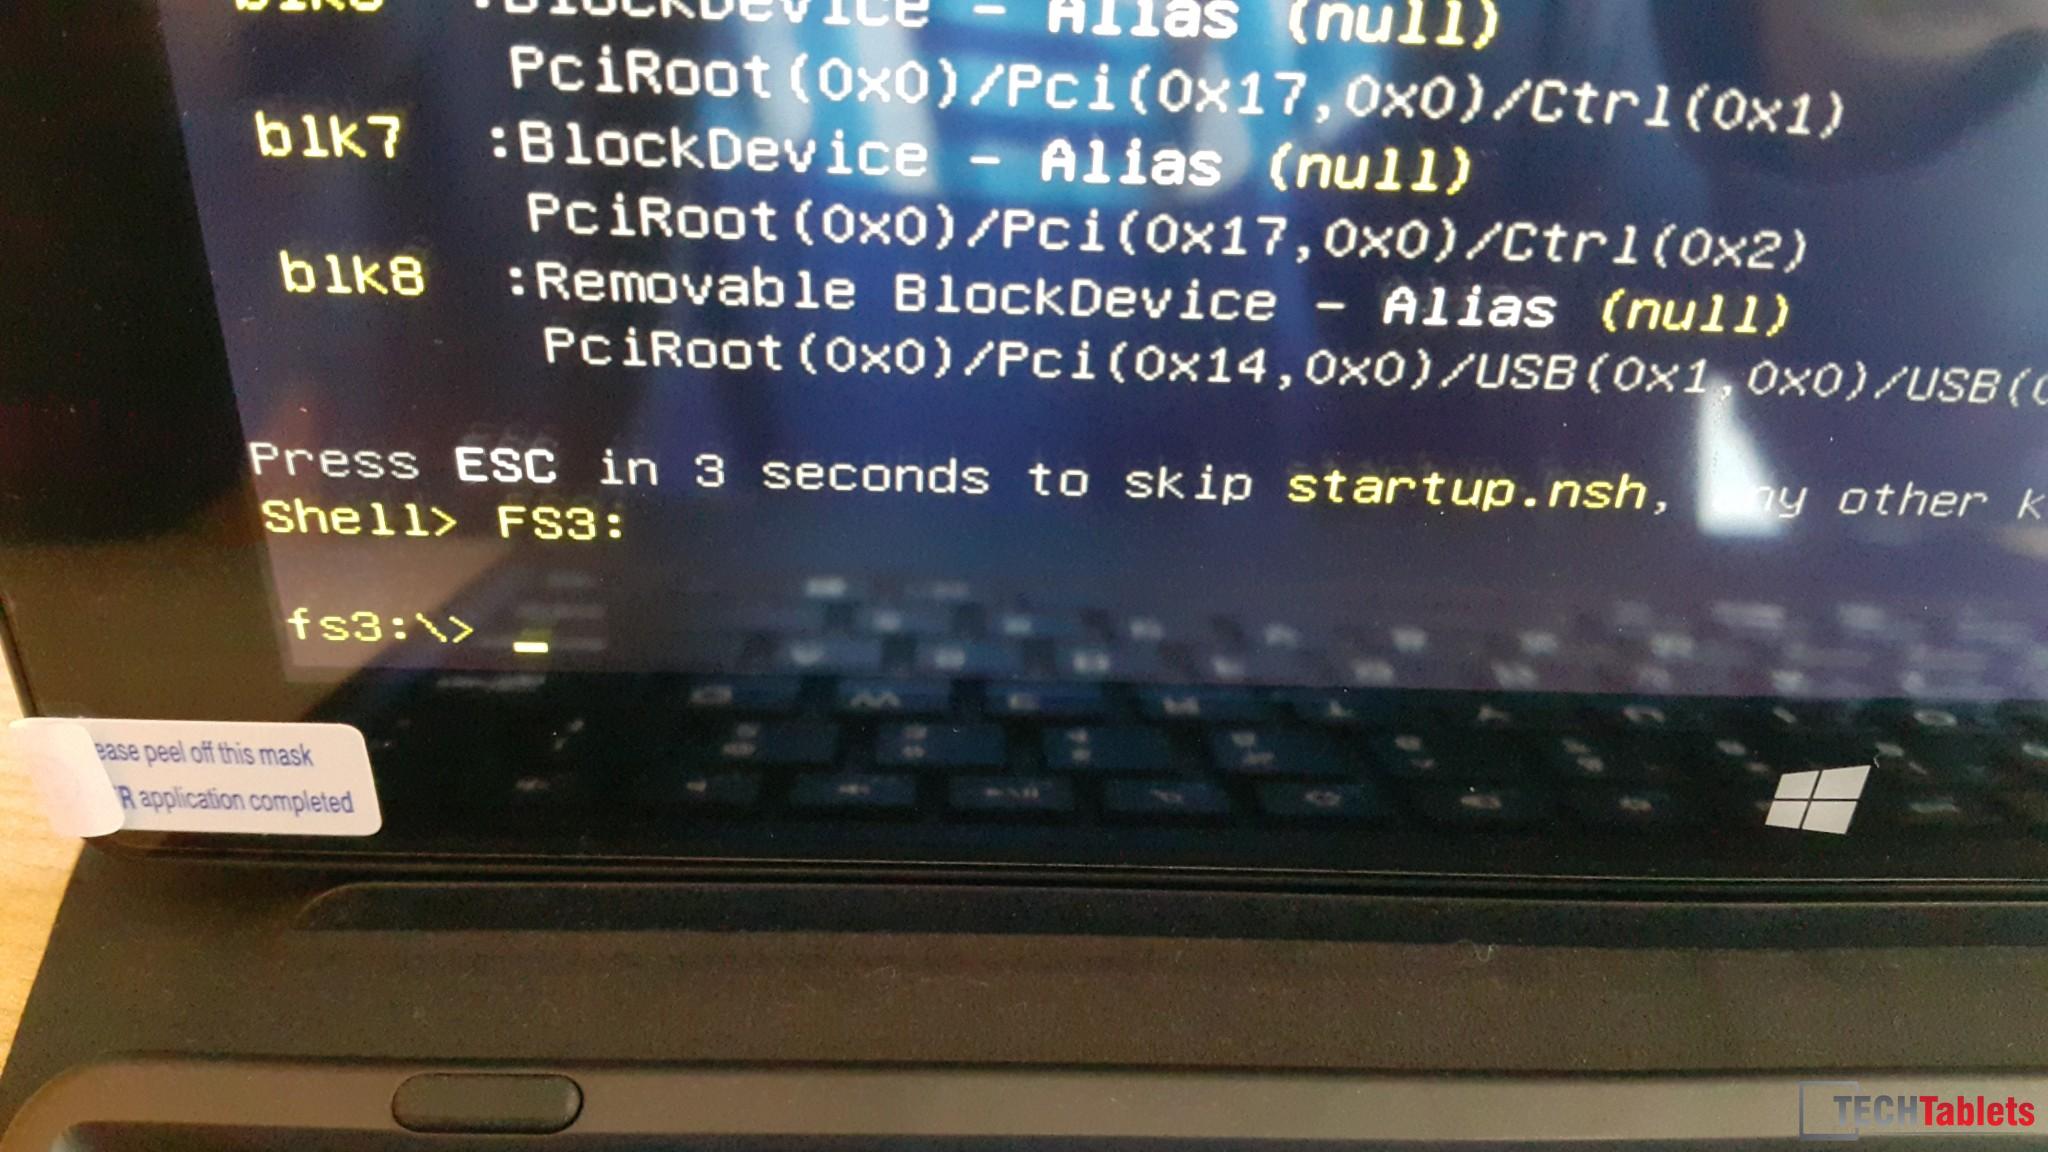
Fs3: was my drive for the usb 2.0 port.
Type DIR to list the content of the drive and check its where the bios.bin is and all the files.
Flash the bios: type the follow (if you name the bios file bios that is!)
fpt32.efi -f bios.bin
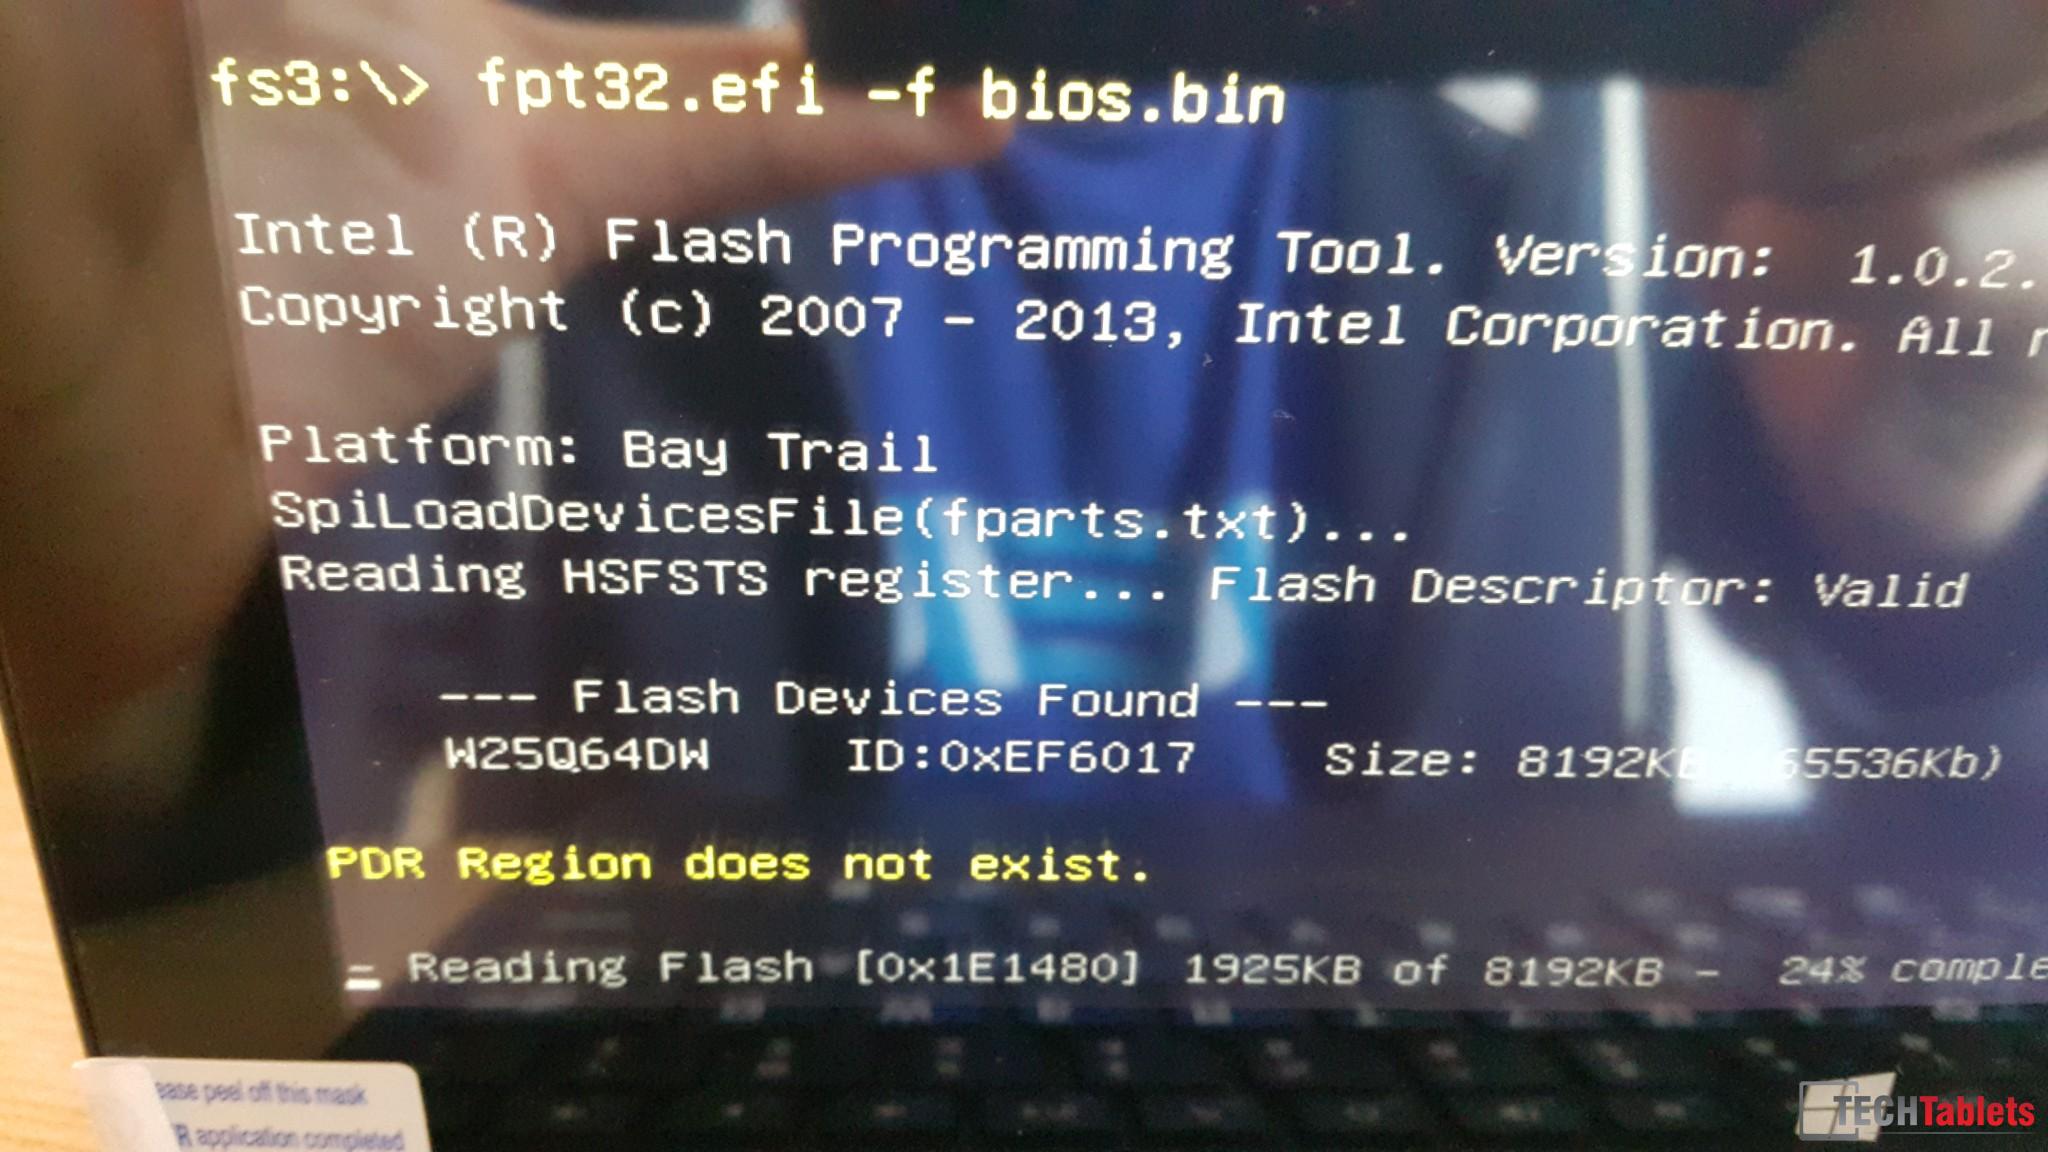
fpt32.efi -f bios.bin Is what you need to type if you renamed the bios to bios!
It will now flash the bios. WARNING, before doing this make sure you have at least 50% battery or more or risk a BRICK!
Once done type, exit and you’ll be back in the bios. Then save and exit the bios.
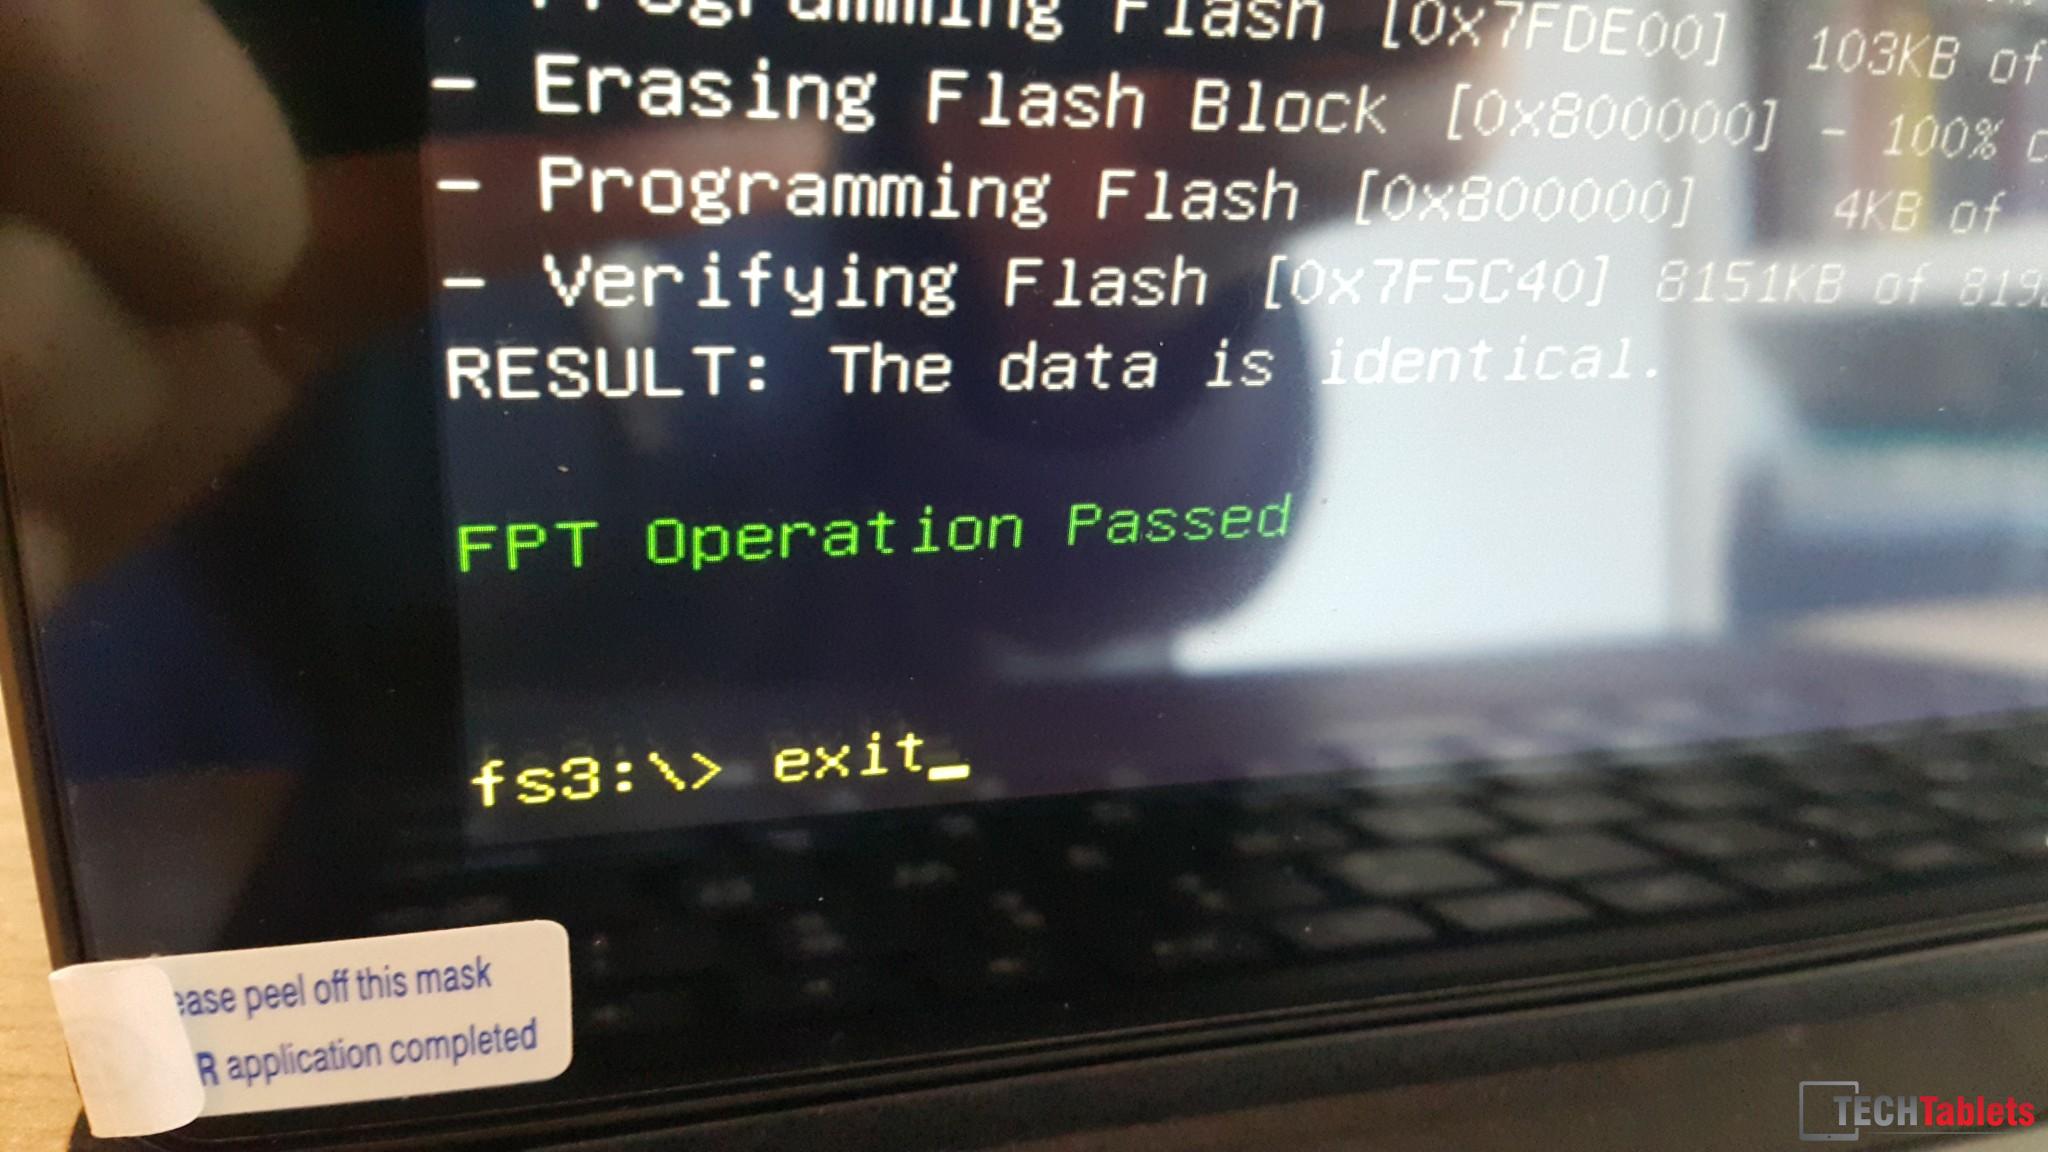
Now type Exit to … Exit!
Step 3:
Flashing the Android rom, with a fat32 formatted drive copy the files inside 安卓(2) to this drive. Put it in the usb port.
Power on the W3F again and enter the bios again. Go to Save & Exit bios menu and then Launch EFI Shell from filesystem device. This time quickly press enter once the screen leaves the bios menu. If it worked you’ll see it’s loading Android and then a Droidboot screen. The Android rom is now flashing. Let it finish.

If you have done things right you’ll see this droidboot menu pop up and it starting to flash the Android rom.
Step 4:
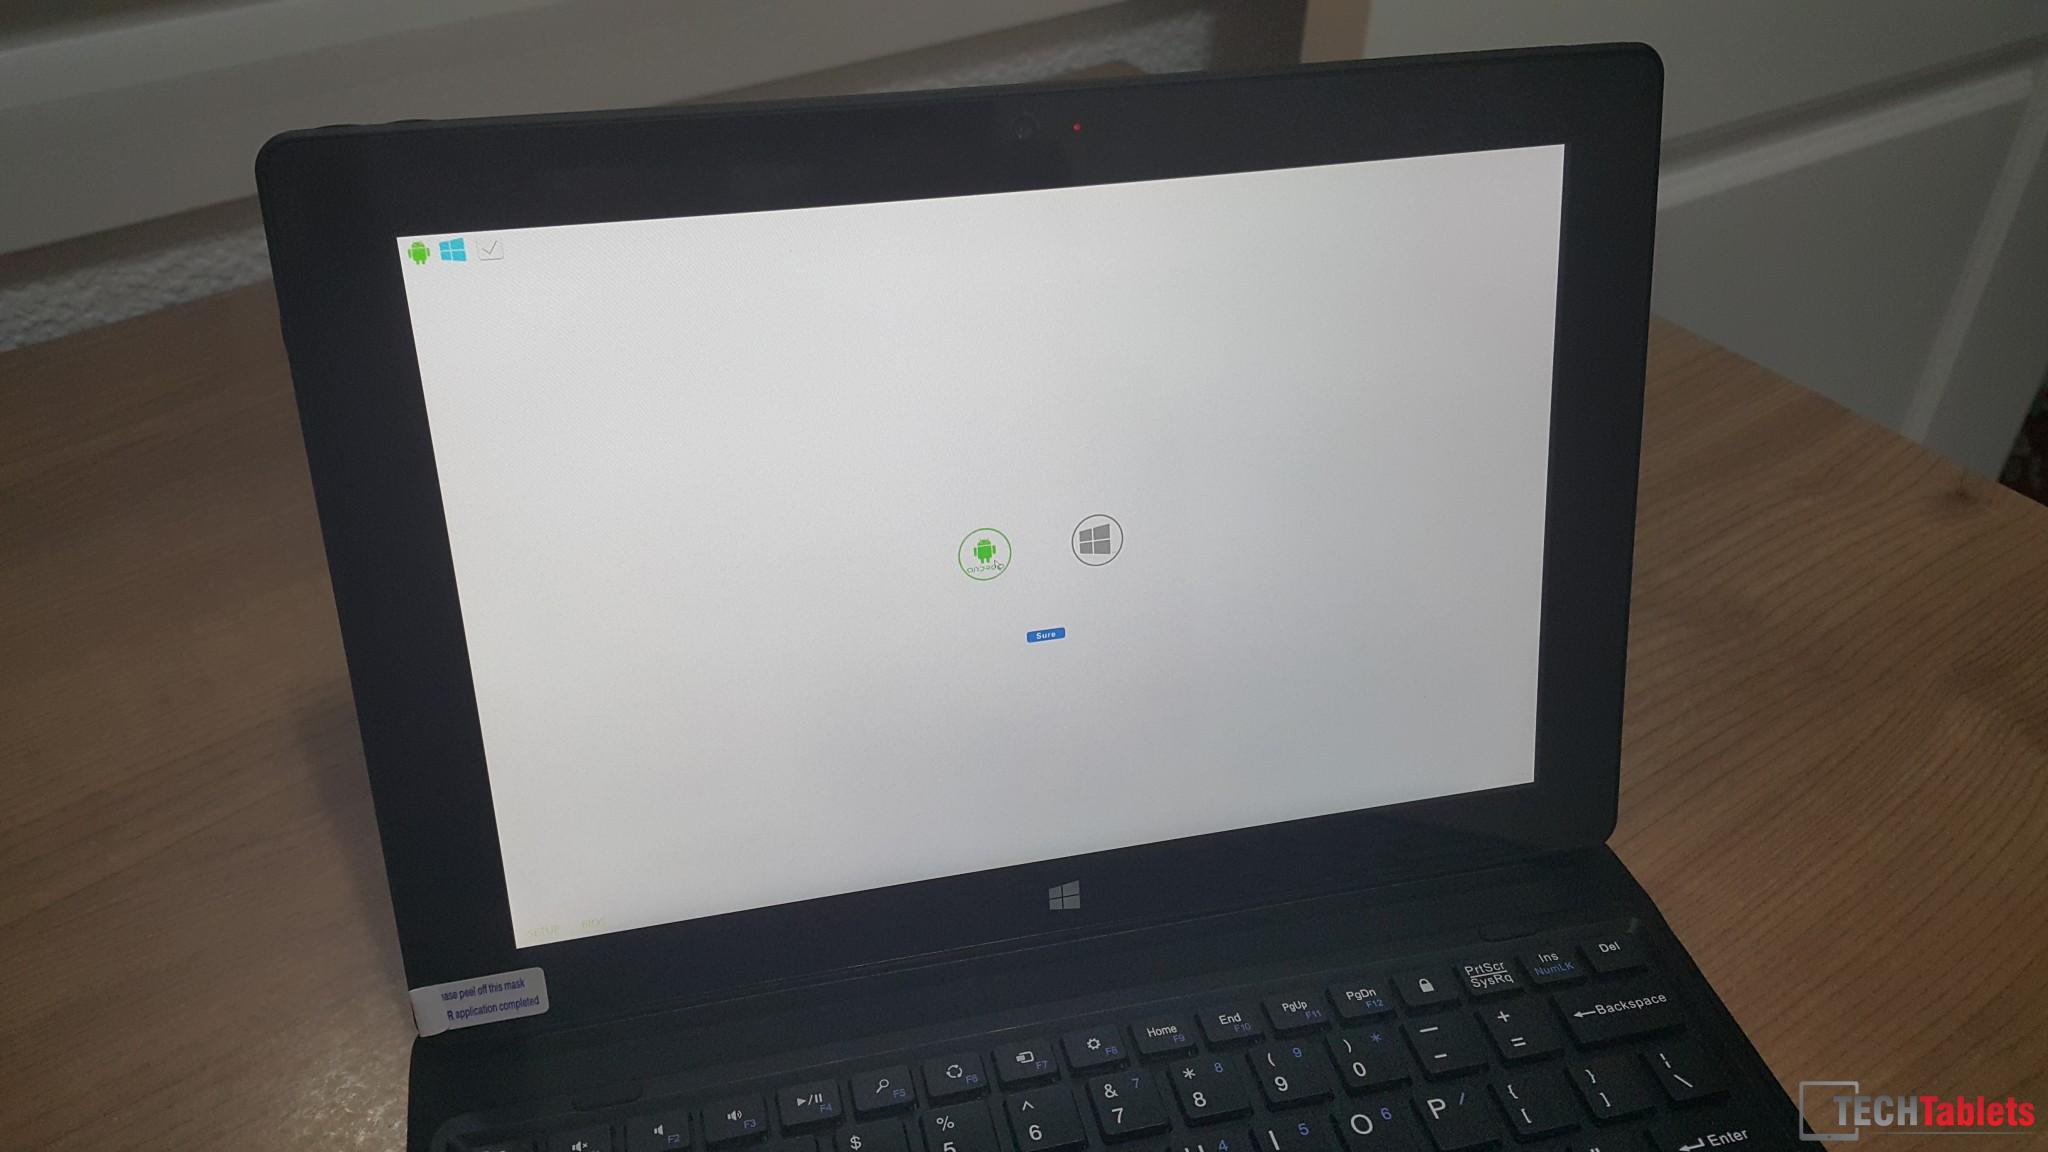
Now select the Windows icon and make sure that ntfs WinPE usb drive is in the usb port.
Now with a flash drive of 8gb or more, formatted to NTFS and named was WINPE, transfer all the files inside the windows8.1(3) file to the root of this new ntfs formatted drive, once done or prepared already. Place this drive in the usb port. Reboot the system and hold the volume + key. You should see the dual boot menu. Select the Windows boot option and “Sure” this should then boot from the WINPE ntfs drive and do it’s thing.

If all goes well you should see this screen…
After about 5 minutes it will reboot and your DONE!
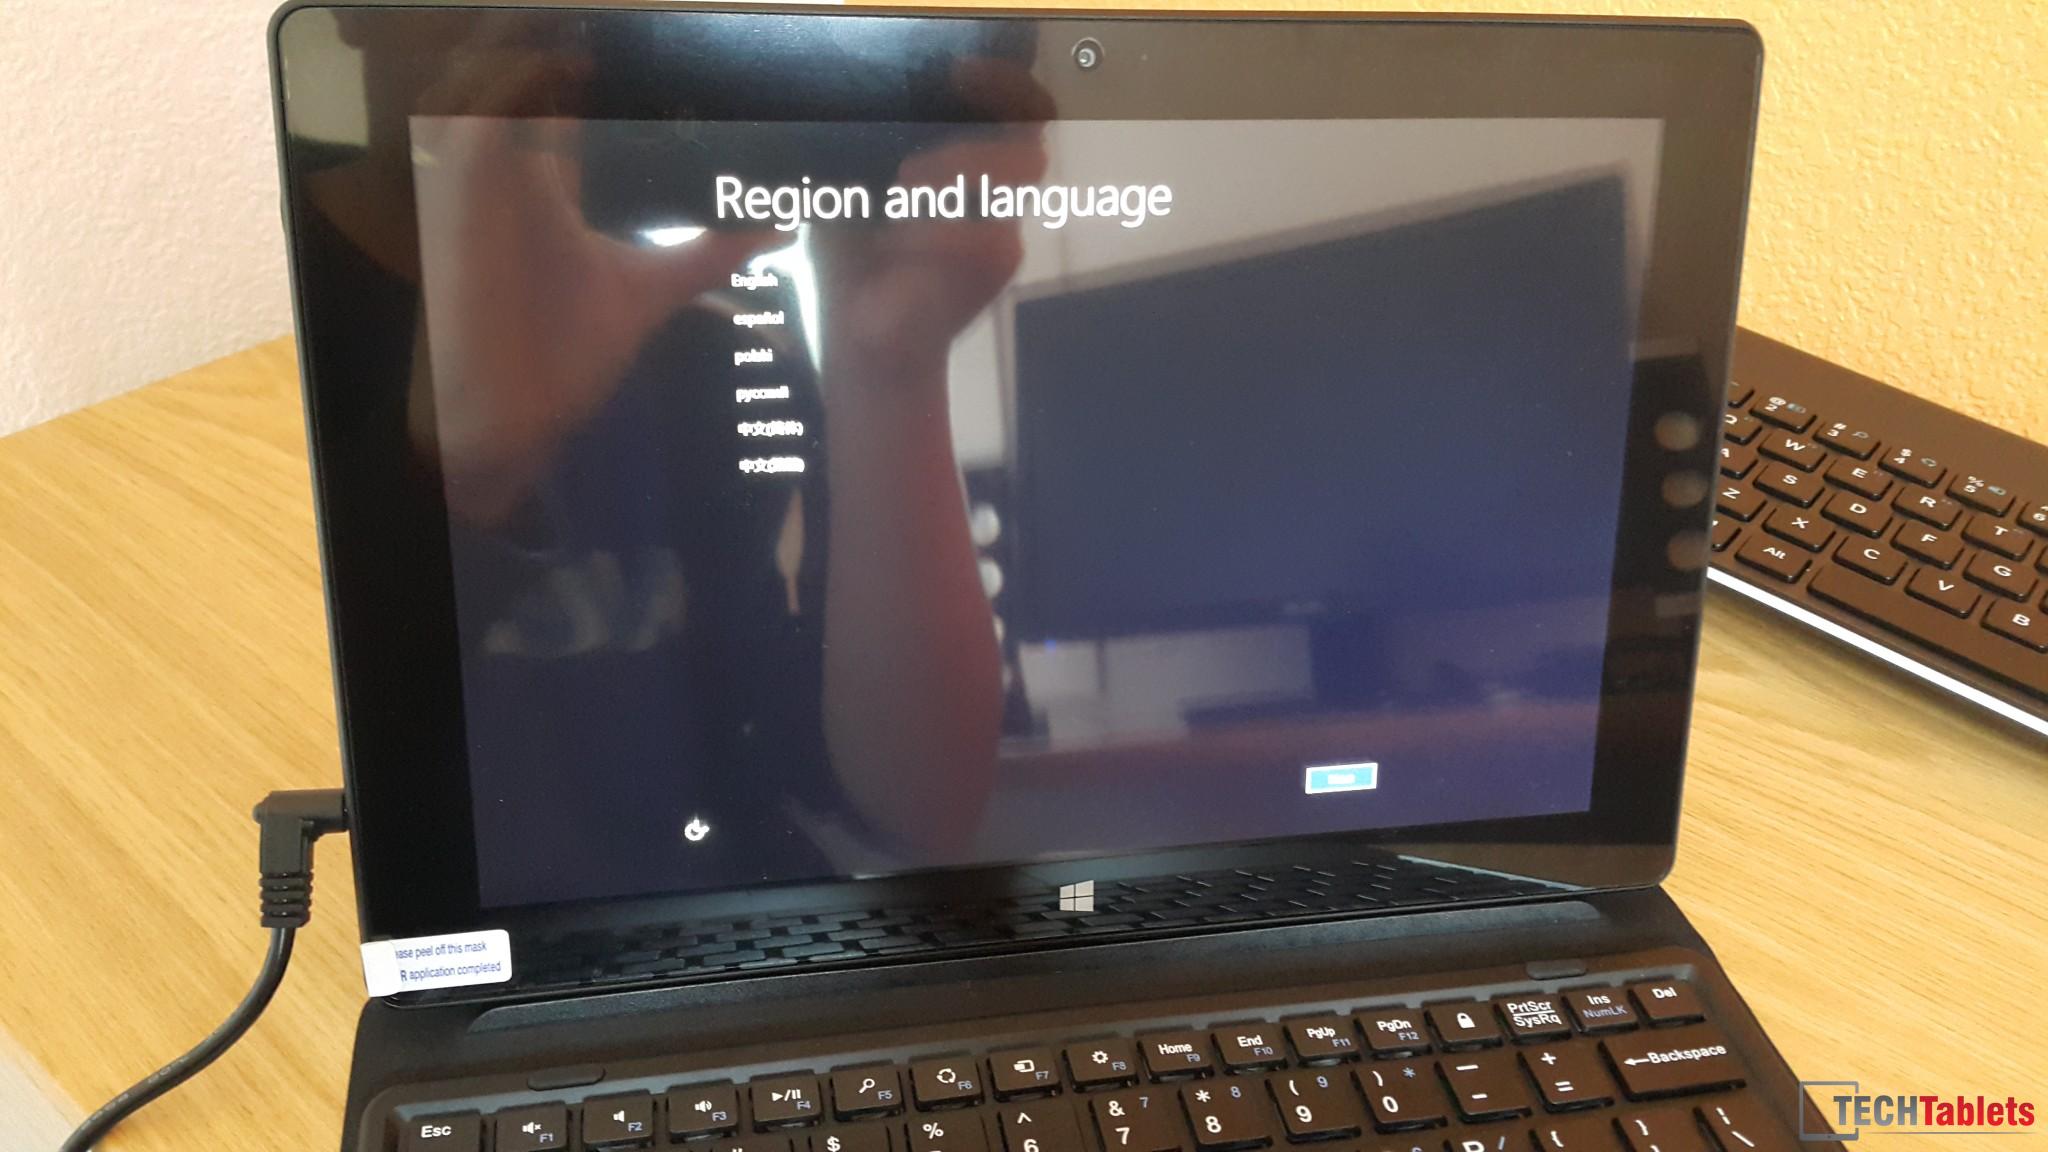
Done! Now boot into windows and set it up!
Issues encountered:
- Keyboard dock shift key functions are not working
- Windows 8.1 Bing will not activate on my unit. Maybe copy your Bing key first before flashing to dual boot? This may work or may not it’s something I wish I tried.
Troubleshooting:
Didn’t work? Check you have formatted the drive to fat32 or ntfs as required? Check you copied the files correctly to the root of the usb flash drive. If all else fails, ask for help here in the comments.
Help Us and give a mirror!:
Please post a mirror of the large Android rom and Windows image files. This will greatly help reduce our bandwidth cost which is expensive and growing by the day. Techtabelts.com, is chewing threw more than 4TB in data a month.. And its growing. Personally I hate free file share services as eventually the files end up disappearing or dead links etc. And I believe in giving our readers fast BS free downloads.
Downloads:
[wpfilebase tag=list id=’72,73′ tpl=table pagenav=1 /]