
TechTablets › Forums › Cube Forums › Cube i7 Book › Cube i7 Book Internals – Intel 3165 Wireless AC, dual antennas & copper
- This topic has 16 replies, 11 voices, and was last updated 7 years, 9 months ago by
Andrew W.
-
AuthorPosts
-
July 7, 2016 at 8:11 pm #42856
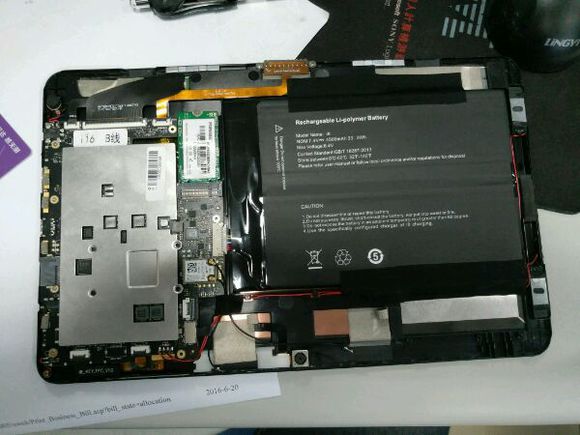
Here are some shots of the internals of the i7 book. Not sure I’ll open mine up, but if I do, maybe just do a quick copper heat sink mod like the i9.
Chris | Admin
Please support us and help keep TechTablets online. Affiliate revenue is used to pay for the server, studio apartment (Techtablets HQ) and buy new tech to review. Without it, this site would be dead.
Next up for review:
Ordered and waiting for my: BMAX S15 & Teclast F6 Plus
Currently testing: LG G8X & Redmi K30July 7, 2016 at 9:21 pm #42863Thanks for these.
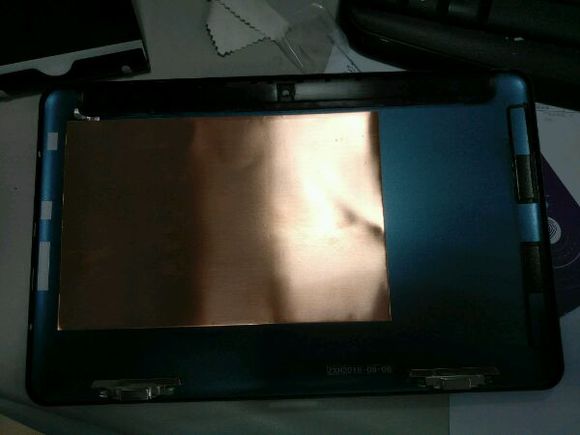
Interesting that there’s a huge copper foil looking thing for, I assume, spreading heat more equally on the back? Or was that a mod someone did themselves?
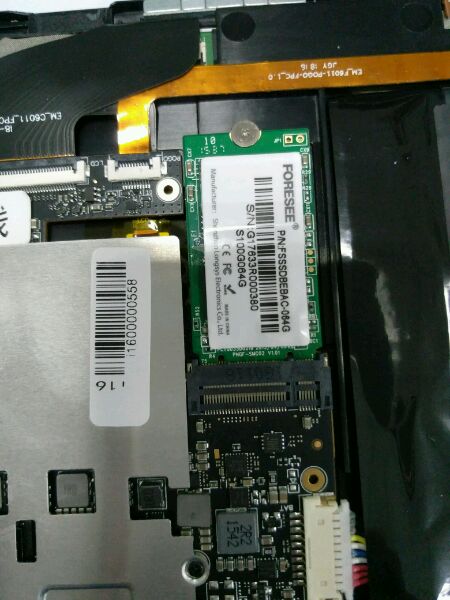
Wi-Fi looks nice, hopefully connected via Pci-e. (I think it is, as pads on top look a lot like a USB connection and are unpopulated)
Plus some possibilities for some heatsink modding and making it larger after you swap the SSD as not to open the thing up again. Sad that 1mm thick heatpipes are impossible to get not in bulk…
Edit: Also if you say that speakers are beyond terrible, might be interesting to try and get them replaced, since I’ll have to open up mine any way to swap the SSD when it eventually comes. ( Sent via Mongolia post to RU… so yeah… will probably take forever).
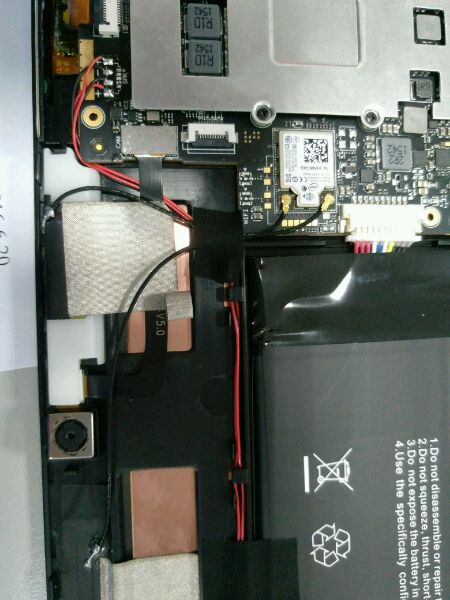
July 7, 2016 at 9:25 pm #42865Is there a connector for a modem ? The motherboard of the Stylus was having an unpopulated connector labelled “3G” … really wondered what it was doing … it looks like it’s still here, not far from the Wifi module…
July 7, 2016 at 9:31 pm #42867Looks to me more like some flex cable connector for some different touch interface or something, since and I’m assuming here the lego connector near it is for Wacom stylus controller and power stuff, at least if the copper looking stuff under it is for inductive power and it seems to be connected to it.
July 7, 2016 at 10:30 pm #42871You’re probably right. Maybe there is a way to intercept a USB port in the keyboard if there is room in it ? Is there any picture of its internals ? Anyhow I can also use one of the USB port of the Keyboard directly with an external usb modem … would probably be faster …
July 8, 2016 at 4:51 pm #42927I had the same thought about adding an internal usb device to the iWork10 keyboard, but it’s very firmly glued together and wasn’t at all interested in cooperating. This keyboard seems much the same, so I don’t think modding it is a good idea
July 12, 2016 at 10:05 am #43240While I was upgrading the SSD to a 256Gb one, I have seen that the thermal dissipation can be greatly improved. I do not know much on the subject, but there is no thermal pad between the aluminium sheet over the CPU and the Copper sheet on the back of the device. It means that its mostly air that conducts heat from the CPU heat dissipator to the external case. It seems to works correctly enough as the device is not throttling at all, at least during my experiments with it, but I think that improving heat dissipation might improve a lot the comfort of the user.
I will add some copper shim and thermal pad to have a good thermal bridge between the CPU and the device casing. But how can I know the thickness of whatever I have to add ?
July 12, 2016 at 5:31 pm #43290I’ve just ordered mine as well and the temps Chris mentioned in his video also make me consider doing a mod. Just need to find a good source for the copper shims and the right dimensions that can ship it to Sweden in a short time.
Looking at Chris previous videos on the cube i9 (link1, link2) as well as this guy who does a more step by step video, I would speculate that 1mm thickness would be ok and 20mm x 20mm seems to minimise thge risk of not covering the whole chip.
Just make sure you have thermal adhesive pad as well as you probably need the copper to stick on the shielding unit.
Odd thing is that the unit in the picture in the first post seem to be missing a thermal pad between the shielding and the copper film. There is a slightly dented rectangular area in the shielding above the CPU/GPU, but no pad to be found. Sloppy assembly or intentional? would be good to know if Chris temps are due to one thermal pad missing or if it is a subpar thermal compound they are using.
Any thoughts on this Chris or Likom? Can you post some vidoes of how to open the tablet as well as vidoes of the thermal solution? (and yes I am just teasing you to get someone else to open their tablet so I don’t have to do it “blind” :P)
July 12, 2016 at 6:51 pm #43298There is no thermal pad on my tablet either, so I guess that this is intentionnal, and I definitely will do a thermal mod of some sort.
The tablet is quite hard to open, it’s a pretty tight fit. I broke one smal plastic tab near the power button … It does not seem that this tabe has any other purpose than to break easily. I hve started by the plastic area at the top and I have then goes to the left and the right with 2 mediators. The fit is so tight that the mediators are ruined and I will have to buy some new one for the next time i want to open the tablet. Remember to remove the SD card, end by the pogo pins at the bottom (they protrude inside the metal, so if you start by them, you will ruin them.
The opening is very similar to what I have seen on youtube for the Stylus
July 14, 2016 at 1:46 pm #43484I’ll be modding mine soon and post a video of the process. I think even just a large 2mm thick thermal pad would do wonders for heat transfer away from the CPU and onto the rear housing. I’m looking at adding maybe some copper, just a 10 x 10 x 1mm shim like I did on the Cube i9 should be enough with a large thermal pad to lower max temps a good 15 degrees. On the 2W Atom’s it gives normally 20 degrees lower temps. But this is a much hotter Core M3 chipset.
More on this coming soon.
Chris | Admin
Please support us and help keep TechTablets online. Affiliate revenue is used to pay for the server, studio apartment (Techtablets HQ) and buy new tech to review. Without it, this site would be dead.
Next up for review:
Ordered and waiting for my: BMAX S15 & Teclast F6 Plus
Currently testing: LG G8X & Redmi K30July 14, 2016 at 4:42 pm #43501Would be really helpful if you can scan the original heats ink and measure it’s thickness + any one dimension for reference. I want to laser cut one out of copper and this will be of great help, since I’d have a heatsink ready by the time I get it.
July 23, 2016 at 11:00 am #44285There was this guy on 4pda.ru who added a DVBT tuner, 2 USB ports and a 3G modem stick to his OG Stylus but needed some cable routing all over the place and soldering near the keyboard dock connector.
If the unsoldered pads are USB pads, then modding this Stylus book will be even easier than the OG Stylus.
July 26, 2016 at 12:04 pm #44524Is there any reason not to just cut a hole in the stock piece of metal that covers the motherboard (the one with the yellow insulation on the underside). Then mount a 2mm (or whatever thickness will contact the large piece of copper on the cover) piece of copper over the cpu and reinstall the stock metal bit ?
July 26, 2016 at 3:31 pm #44547Is there any reason not to just cut a hole in the stock piece of metal that covers the motherboard (the one with the yellow insulation on the underside). Then mount a 2mm (or whatever thickness will contact the large piece of copper on the cover) piece of copper over the cpu and reinstall the stock metal bit ?
You want the additional thermal mass of the metal plate to help dissipate the heat more effectively. It’s also doubtful you’ll find a shim with the exact thickness necessary to contact both the back of the case and the CPU/GPU precisely without necessitating using a thermal pad.
July 28, 2016 at 8:03 pm #44899Hi,
Had to create an account to download cube i7 work drivers (fresh win10 install).
Id like to thank the OP for his tutorials on this and other tablets. I successfully upgraded ssd and heatsink, thank you very much. So far so good, the only issues appear to be: drivers (easily fixed), the case has not fully snapped back around the power button area (literally 1/10mm but i can notice it) and the left of the screen has 2 light areas when the background is black.
Thanks again 🙂
-
-
AuthorPosts


- You must be logged in to reply to this topic.
